Search This Supplers Products:Magnetic materials, magnetic equipment and devicesAuto Partstelecom devicesElectronicselectricalsmetals
A bit talk about "Roughness"
publisherWilliam Chang
time2020/03/27

- A bit talk about "Roughness"
What is Surface Roughness?
Surface roughness often shortened to roughness, is a component of surface texture. It is quantified by the deviations in the direction of the normal vector of a real surface from its ideal form. If these deviations are large, the surface is rough; if they are small, the surface is smooth. In surface metrology, roughness is typically considered to be the high-frequency, short-wavelength component of a measured surface. However, in practice it is often necessary to know both the amplitude and frequency to ensure that a surface is fit for a purpose.
Controlled roughness can often be desirable. For example, a gloss surface can be too shiny to the eye and too slippery to the finger (a touchpad is a good example) so a controlled roughness is required. This is a case where both amplitude and frequency are very important.
The parameters given below are in accordance with
GB / T3505-2000 "Product Geometry Technical Specification Surface Structure Profile Method Surface Structure Terms, Definitions and Parameters", and
GB / T6062-2002 "Product Geometrical Specification Technical Specification (GPS) Surface Nominal characteristics of Structure Profile contact (stylus) instruments.
Now let's begin with a few examples.
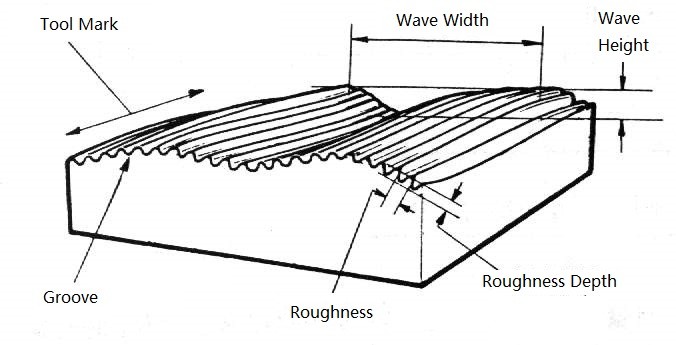
Cross-section surface roughness and contour of the workpiece after N times magnification
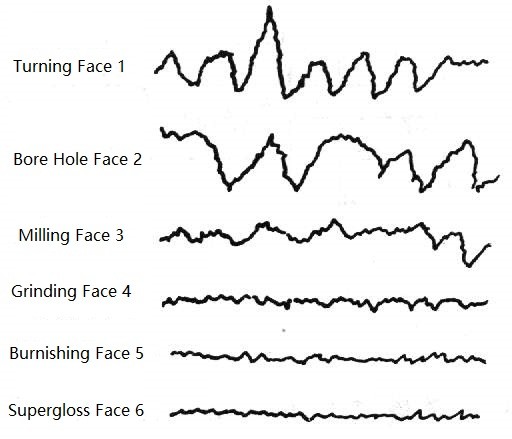
Surface finishes obtained by various processing methods

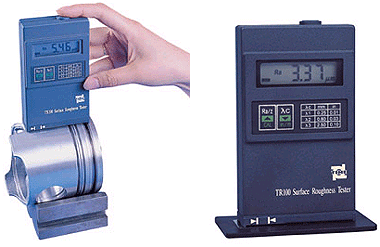
Roughness can be measured by manual comparison against a "surface roughness comparator" (a sample of known surface roughness), but more generally a surface profile measurement is made with a profilometer. These can be of the contact variety (typically a diamond stylus) or optical (e.g.: a white light interferometer or laser scanning confocal microscope).
Key technical terms of surface roughness:
(1) Surface roughness: sampling length L
The sampling length is a length of a reference line specified for judging and measuring the surface roughness, and it samples on the overall direction of the contour.
(2) Surface roughness: Evaluation length Ln
Because the processed surface has different degrees of non-uniformity, in order to fully and reasonably reflect the roughness characteristics of a surface, a length of surface necessary for evaluation is specified, which includes one or more sampling lengths, called the evaluation length Ln.
(3) Surface roughness: the centerline of the contour (also called the curve average line) M

The contour centerline M is the reference line for evaluating the surface roughness value
Nationally prescribed parameters for surface roughness consist of height parameters, pitch parameters and comprehensive parameters.
There are three surface roughness height parameters:
(1) Contour arithmetic mean deviation Ra:
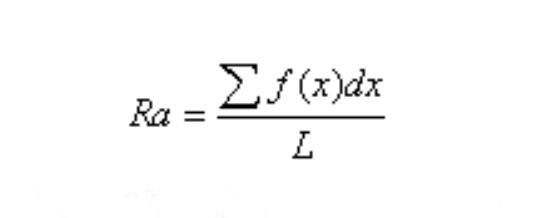
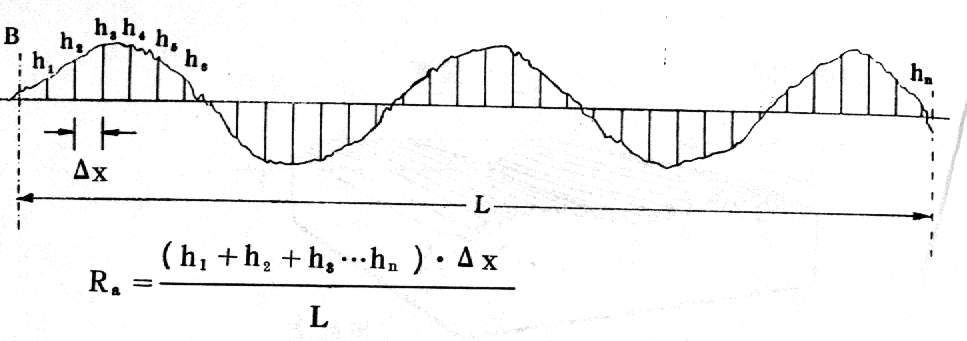
The arithmetic mean of the absolute value of the contour offset within the sampling length L.
(2) Ten points height Rz of micro unevenness
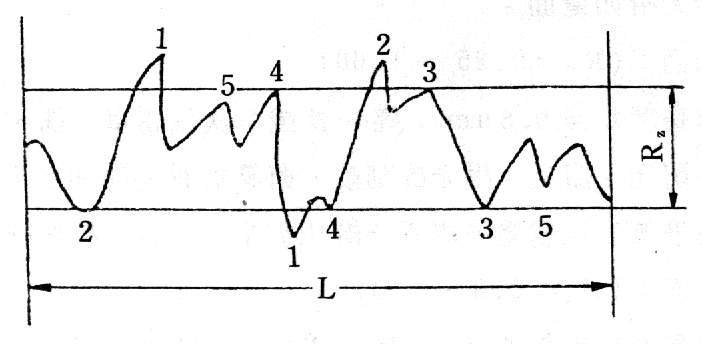
The sum of the average value of the largest contour peak height and the five largest contour valley depths within the sampling length L.
(3) Maximum contour height Ry

The distance between the contour peak line and the contour valley line within the sampling length.
(4) Single peak average spacing S
The projection length Si of the highest point of two adjacent contour unimodals on the centerline is called the contour unimodal spacing. Within the sampling length L, the average value of the contour unimodal spacing is the average contour unimodal spacing.
(5) The average distance Sm of the micro unevenness of the profile
The length Smi of a section containing a contour peak and an adjacent contour valley is called the contour micro uneven distance.
(6) Profile support length ratio tp
The contour support length ratio is the ratio of the contour support length np to the sampling length L.
Conclusion:
Roughness plays an important role in determining how a real object will interact with its environment. In tribology, rough surfaces usually wear more quickly and have higher friction coefficients than smooth surfaces. Roughness is often a good predictor of the performance of a mechanical component, since irregularities on the surface may form nucleation sites for cracks or corrosion. On the other hand, roughness may promote adhesion. Generally speaking, rather than scale specific descriptors, cross-scale descriptors such as surface fractality provide more meaningful predictions of mechanical interactions at surfaces including contact stiffness and static friction.
Although a high roughness value is often undesirable, it can be difficult and expensive to control in manufacturing. For example, it is difficult and expensive to control surface roughness of fused deposition modelling (FDM) manufactured parts. Decreasing the roughness of a surface usually increases its manufacturing cost. This often results in a trade-off between the manufacturing cost of a component and its performance in application.
